How to Export Print-Ready PDFs from Adobe InDesign
Preparing your files correctly is essential for professional print results. Adobe InDesign offers powerful tools to ensure that your layout, colors, bleeds, and fonts are all exported accurately. At IMAGE ZONE, we recommend exporting your artwork to PDF using specific settings that match commercial print standards, guaranteeing your designs look as sharp on paper as they do on screen.
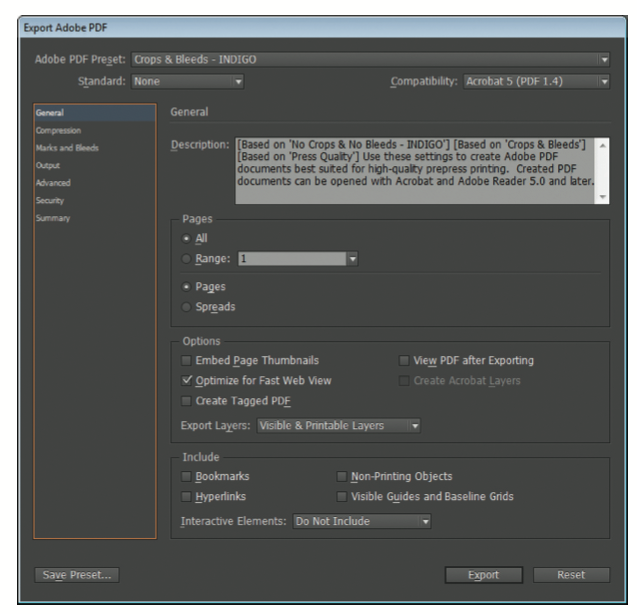
When you're ready to export from InDesign, be sure to include proper bleeds, embed fonts, and use the correct color space. Below is a quick overview of the export process to create a press-ready PDF suitable for flyers, brochures, business cards, booklets, signs, and more.
Recommended Export Settings
- PDF Preset: Use “Press Quality” or a custom preset with high-resolution settings
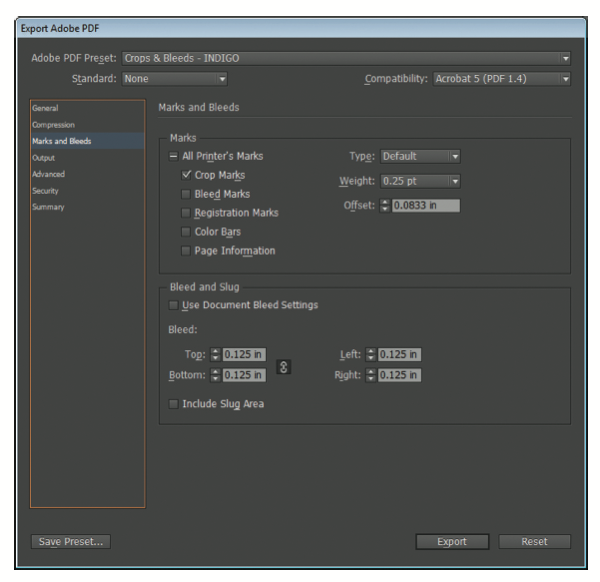
- Marks & Bleeds: Check “Use Document Bleed Settings” and include a .125" bleed all around
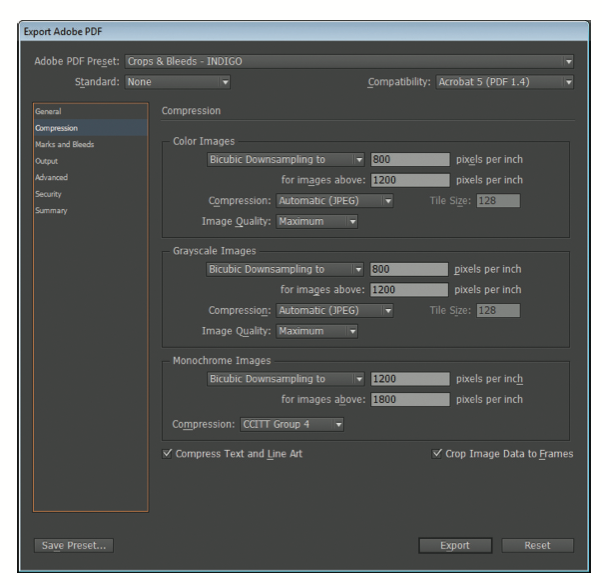
- Compression: Keep image resolution at 300 dpi for color and grayscale; avoid downsampling below this
- Color: Set output to CMYK; convert all colors to CMYK to avoid unexpected shifts
- Fonts: Ensure all fonts are embedded or outlined to prevent font substitution
- Transparency: Flatten transparency for complex vector art or layered effects if needed
Tips for Better Print Results
- Double-check that your document size matches the final trim size, with bleeds extending beyond the edge
- Use rich black (C:60 M:40 Y:40 K:100) for deep black areas instead of 100% K
- Keep important text and graphics at least 0.125" away from the trim line (safe zone)
- Convert all spot colors to CMYK unless you are requesting Pantone spot color printing
- Review your exported PDF using Adobe Acrobat Pro or a professional PDF viewer before submission
Serving Murrieta, Temecula & Beyond
IMAGE ZONE helps local businesses and creatives prepare their InDesign files for print with expert guidance and free file checks. Whether you need assistance setting up bleeds or optimizing output settings, we’re here to help make your project print perfectly the first time. Located in Murrieta and serving the surrounding Temecula Valley, we welcome walk-ins and offer fast, reliable printing.
Need Help? Let Us Review Your File
If you’re unsure whether your PDF is ready for production, feel free to send it our way. We’ll review it and let you know if any adjustments are needed. You can also request a printed proof to see how your layout looks before going to press.
Call: 951-304-1330
Email: info@izprinting.com