Understanding Image Area, Bleeds & Safe Zones
When preparing artwork for print, it’s essential to understand how image area, bleed, and safe zones affect the final result. These layout guidelines help prevent important text or design elements from being trimmed off and ensure your background colors and graphics extend cleanly to the edge of the printed product.
At IMAGE ZONE, we work with your files to achieve professional, edge-to-edge printing. Whether you're designing business cards, postcards, banners, or booklets, properly setting up bleeds and margins ensures the best visual outcome and eliminates the risk of white edges or accidental cropping.
What Is Bleed?
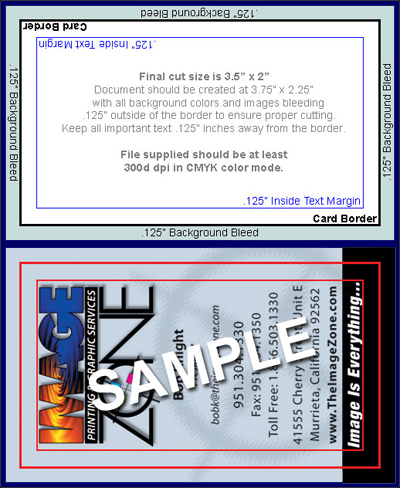
Bleed refers to the area of your artwork that extends beyond the trim line. This extra space—typically 0.125 inches on all sides—gets trimmed off during finishing, but it ensures that your design prints all the way to the edge without gaps.
- Always extend backgrounds, images, and fills into the bleed area
- Use at least 0.125" bleed on business cards, flyers, and similar products
- For large signs or banners, check the product specs for custom bleed settings
What Is the Safe Zone?
The safe zone is the area inside your document margin where all critical text and logos should be placed. Keeping these elements at least 0.125" to 0.25" inside the trim line helps avoid accidental cutting during trimming.
- Keep all important text, logos, QR codes, and graphics within the safe zone
- Do not place thin borders too close to the edge—they may appear uneven after trimming
- Review your file at actual size to confirm spacing and placement
What Is Trim Size?
Trim size is the final size of your printed piece after the bleed area has been cut off. This is the exact dimension you selected when placing your order—for example, a 4" x 6" postcard or a 3.5" x 2" business card.
Need Help with Layout?
We’re here to help you get it right. If you’re unsure how to set up bleeds, trim marks, or safe margins in your file, our design and prepress team can review your layout and offer suggestions. We also provide downloadable templates and hands-on design assistance when needed.
Serving Murrieta, Temecula & Nearby Areas
IMAGE ZONE provides local print services backed by expert support and quick turnaround. From digital printing to large-format signs, we ensure your layout prints cleanly and professionally—with no guesswork or surprises.
Questions? Let’s Talk
For layout advice, file setup help, or custom design work, contact our team today. We’ll walk you through the process or adjust your file to match the correct bleed and image area standards.
Call: 951-304-1330
Email: info@izprinting.com